In this article, we will explain in detail what a sample file is and how to choose the right one for recovering a damaged video.
A sample file is a healthy, playable video file recorded on the same device (or software) and with the same settings as the damaged video you want to recover.
Restore.Media requires a sample file to extract valid metadata unique to the camera / software and settings used when recording video. The extracted metadata is then included in the damaged video file during the recovery process.
As a sample file, we recommend using a healthy video recorded on the same device (or with the same software) immediately before or after the damaged file. It is important that the settings used for recording the two files are the same.
If you do not have such a sample file, you can record a random video of several seconds in length. Again, the sample video must be recorded with the same device, software, and settings as the damaged one.
Please note that one of the common reasons why the video recovery process may fail is if the wrong sample file was used. The guide below will help you avoid possible mistakes when choosing a sample file.
1. The Same Device and Software
The sample file must be a healthy, playable video file recorded with the same device or software as the damaged video.
For example, if you recorded corrupted video on a GoPro HERO9, then the sample file should also be recorded using the GoPro HERO9.
Likewise, if you recorded corrupted video using a screen recording application such as OBS, then the sample file must also be recorded using OBS.
2. The Same Recording Settings
The sample video must be recorded with the same settings as the damaged one, including:
- Resolution
- Frame rate
- Orientation (portrait or landscape)
- Zooming
- Bitrate
- Sound settings
- Codecs used (e.g. H.264 / AVC or H.265 / HEVC)
3. Post-Processed Video
Editing, converting, and other manipulations with video files lead to changes in the metadata records.
This means that the unedited video from your camera will most likely not work as a sample when recovering a damaged video that you edited with some software. Even if both files were recorded by the same camera.
Solution?
To recover a damaged video that you edited with any software, use a sample file edited with the same settings and the same software as the damaged file.
To recover damaged video that came out straight from the camera without any additional manipulation, use a healthy playable video sample recorded by the same camera.
4. Screen Recording
When recovering video files recorded with screen capture software, make sure that the sample video has exactly the same resolution as the corrupted file - pixel by pixel. This is something that is easy to miss.
It is equally important that the number of audio streams, frame rate (FPS) and other settings are the same for samples and damaged files.
5. Smartphones
Please make sure the sample and damaged video files are recorded in the same application. The orientation must also match (portrait or landscape).
6. Lighting Conditions
Sometimes cameras automatically adjust video compression profiles based on lighting conditions.
For bright and dark scenes, video compression may differ even if the quality and resolution settings are the same. This behavior is especially common with smartphone cameras.
For this reason, we recommend using sample files recorded under the same lighting conditions.
That is why the best option for a sample file is a video recorded immediately before or after the damaged file, given that the recording settings have not changed, and the clips were recorded one after the other with a short interval of time.
7. Variable Frame Rate
Some devices and software record video files at variable frame rates. This is common among smartphones and screen capture software.
If your corrupted video file was recorded at a variable frame rate, it is likely that Restore.Media will not be able to sync video and audio streams when restoring the file, regardless of the sample file used.
Here is why:
When the camera records video, indices (in particular, the timestamps of each frame) are collected in its internal memory.
If video recording is abruptly interrupted and the file is not finalized, the indices are lost. This means that the exact time of each frame is lost and cannot be determined. The only solution to this problem is to use the average frame rate in the recovered file.
Based on the duration of the sound and the total number of frames, we can calculate the average frame duration (frame rate).
In practice, this means that audio and video are synchronized only at the very beginning and at the very end of the clip. Whereas in the middle of a clip, audio and video tracks will most likely be out of sync.
Unfortunately, this synchronization problem cannot be resolved.
Therefore, we recommend that you avoid using variable frame rate whenever possible.
8. Recap
When recovering damaged video files, make sure the sample file meets the following requirements:
1. It’s a healthy, playable video file.
2. It was recorded by the same device (or software) as the damaged file.
3. It was recorded with the same settings as the damaged file, including: resolution, frame rate, bit rate, orientation, audio settings, codecs, etc.
4. To recover the edited file, use sample files that were edited with the same software and with the same settings as the damaged file.
5. Do not use a video file processed with any software as a sample file to restore an unedited original video file downloaded directly from the camera, and vice versa.
6. On smartphones, videos are often recorded in portrait orientation. Make sure the orientation of the sample and the damaged files matches.
7. When restoring video recorded with a screen capture application, please pay extra attention to ensure that the resolution of the sample video matches the resolution of the damaged video.
8. Avoid recording video with variable frame rate. When recovering VFR video clips, the audio and video streams are likely to be out of sync, and unfortunately there is nothing we can do to fix this issue.
Finally, if you cannot find suitable sample files and cannot record a new one, send us a message and our engineers will try to find a sample file for you.
How to Upload a Sample File
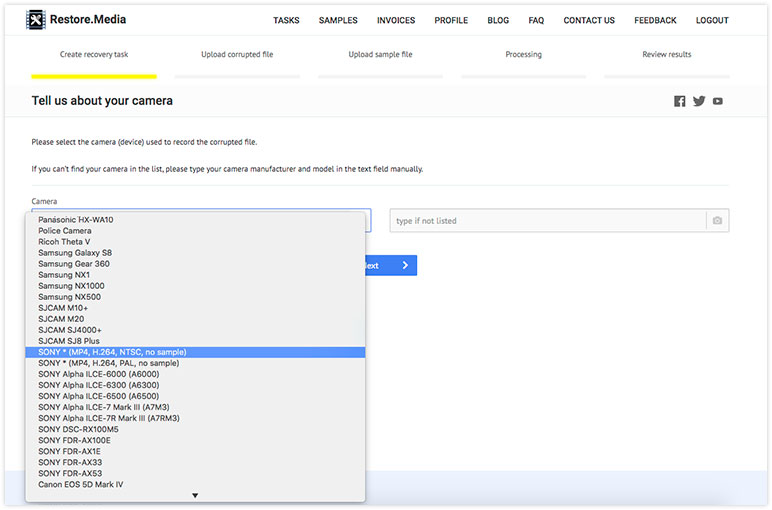
1. When configuring recovery options, select the correct camera, device, or application from the drop-down list as this will help Restore.Media launch the correct recovery algorithm.
If you see a "no sample" comment next to your camera model, as shown in the screenshot below, Restore.Media will most likely restore your file without asking for a sample file.
This, however, does not apply to any smartphones due to the way they record media files. Therefore, do not select the "no sample" option when trying to recover a file recorded on your smartphone.
2. If the corrupted video or audio can’t be repaired without a sample file, Restore.Media will ask you to upload one.
Just click Choose file to upload the sample file from your local storage:
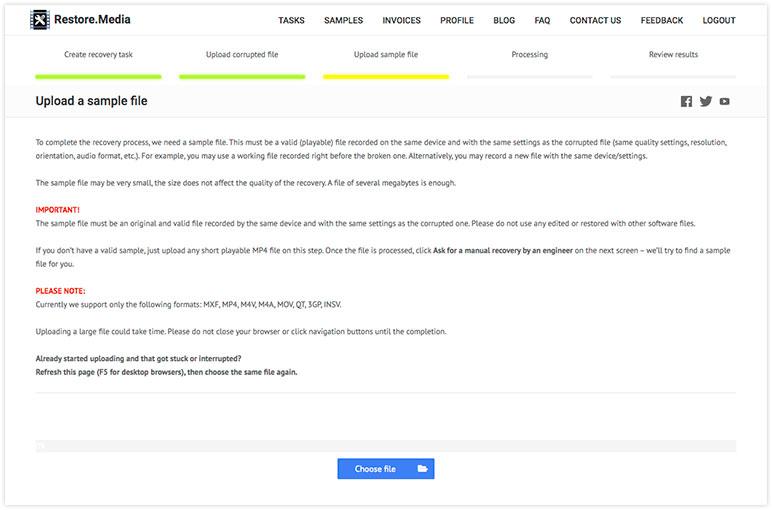
Please note:
For most SONY, GoPro, DJI and some other cameras, our engineers can restore files manually without using a sample file.
If you do not have a sample file, please send us a request and our engineers will do their best to help.
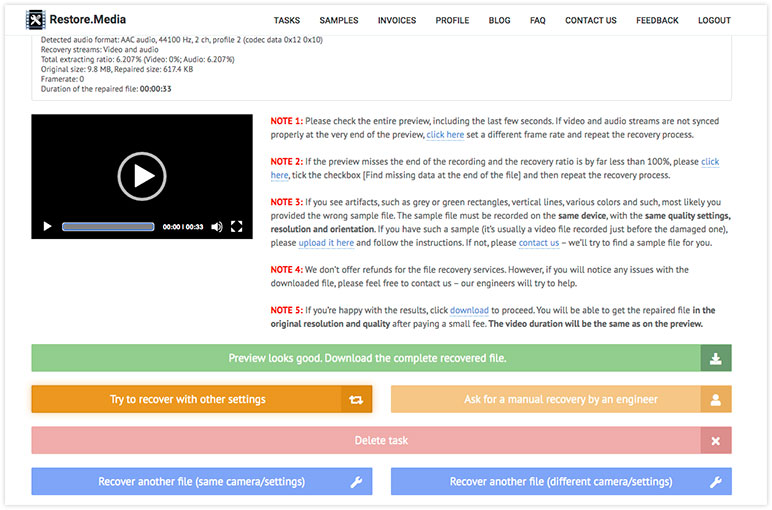
3. If you see a message that the damaged file cannot be restored, or if your preview contains random green / gray / colored blocks or lines, it is probably because you uploaded the wrong sample file.
You can try repeating the recovery process with a different sample file by following these steps:
4. At the bottom of the preview page, click the big yellow button Try to recover with other settings:
5. In the window that appears, click Add a new sample file:
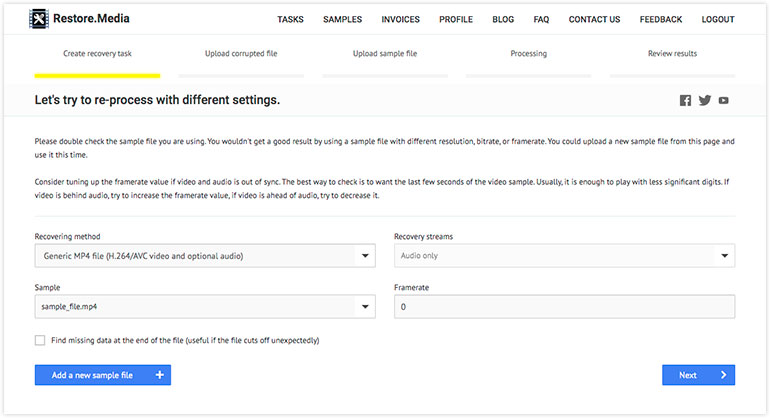
6. Click Choose file to select a new sample file from your local storage:
7. Let Restore.Media repair the damaged file using the data from the new sample file.
8. After the repair process is complete, check the preview.
Please note:
We provide previews only in low resolution and quality. But you can download the recovered file in original resolution and quality after paying for the service.
9. If the preview still contains no valid video / audio data, unfortunately the new sample file you uploaded still does not match the settings in the corrupted file.
Repeat the recovery process with different sample files recorded on the same device (or application) as the damaged file.
You can experiment by uploading sample files with different resolutions, orientations, frame rates, and other settings that you think might match the damaged file.
10. If you are sure you have uploaded the correct sample file, or if you uploaded several different sample files, but the file was never recovered, press the big yellow button Ask for a manual recovery by an engineer:
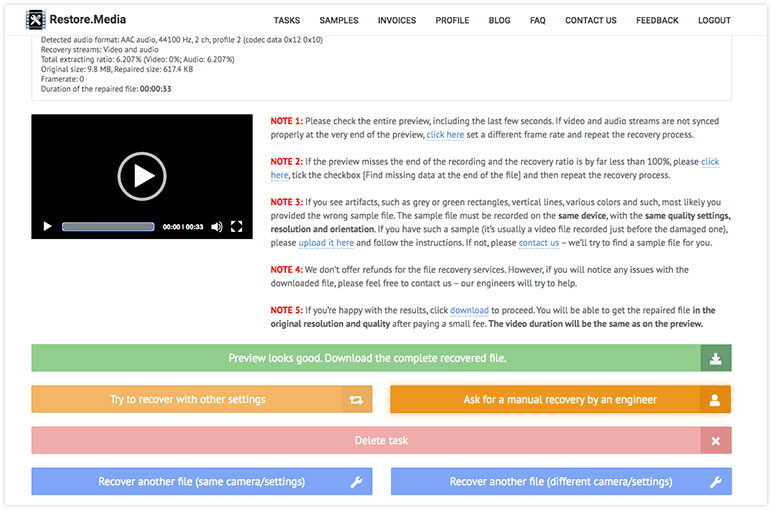
We will check the files you have uploaded to see if they can be repaired and will provide you with further information by email.
Important!
During manual file recovery, one of our engineers may need to view (listen to) a portion of your uploaded video (audio) to get an idea of the problem and how to fix it.
___________
Happy recovering!