Here, at Restore.Media, we are often asked about repairing video files that have been accidently deleted from a flash memory card or damaged due to a glitch / failure of the SD card, and then recovered with some undelete apps or data recovery services. Usually, such recovered videos have original file size, name and extension. And overall, the video may look like a valid file, but can't be played in any media player.

In this article we're going to discover the reasons why you can't play such "undeleted" video files most of the times. How to recover deleted video files from a memory card properly, so that you get your footage back and have it actually playable. And finally, how to protect your video files from being lost.
The article will be helpful regardless of whether you're a photographer who deleted an entire two-day wedding, a journalist who needs to recover an important interview, a vlogger, traveler, video studio professional, or if you just want to recover the deleted video of your most memorable family trip that can't be re-created.
Note: this article applies to video files deleted from flash memory cards only, such as SD, microSD, or similar. The article doesn't cover cases when video files have been deleted from HDD or SSD drives.
The underlying video recovery technology uses similar principles, but may vary depending on the file extension. At Restore.Media we have experience in recovering almost all widely spread types of video and audio files, including MP4, MOV, M4A, 3GP, MXF, as well as video codecs AVC/H.264 and HEVC/H.265. For a full list of supported file types, please see this page. This article applies to all the mentioned file types.
How to Recover Deleted Videos Properly
1. First, Lock Your Memory Card
If you deleted a video file or quick-formatted a memory stick, such as an SD card, the first thing you should do is avoid saving new data or modifying existing files on the memory card.
Turn off your camera, drone or mobile phone and then take your memory card out.
If your memory card is in your computer's in-built or external USB card reader, SAFE-eject the memory card as soon as possible.
If you've connected your camera directly to the computer via a USB cable, then turn the camera off first, then safe-eject it and pull the memory card out of the camera.
This is important because when you delete files, they don't actually get erased from your memory stick. Instead, the file system marks the space occupied by the deleted files as if it was free. As long as the memory card is connected to a device, your deleted video may be overwritten with new data, and the footage is lost forever. This may happen even if you don't specifically save anything on the memory card. Many cameras and other devices write their temporary files on your memory card in the background. So, it's extremely important to safe-eject your memory card as described above as soon as possible.
Once ejected, for SD cards we highly recommend locking them with a safety switch located on the left side of the card. If you have a microSD card, put it into an SD adapter and then lock it the same way. Do not put your SD or microSD card back into any card reader, camera or other device before you've locked it with the safety switch or, otherwise, your deleted video files may be overwritten beyond recovery.
2. Make an Image File
Once you're sure your video files are safe from being overwritten, the next step would be to create a complete sector-by-sector copy (RAW image) of your entire memory card. In other words, it's the exact copy of your memory card, which contains the file system metadata along with data from all memory clusters regardless of whether they're marked as free space or as being occupied by files.
Please note: a complete sector-by-sector copy of your memory card can be created only with the .IMG type of image files. It includes data from the free space clusters of the memory card, where deleted video files are located. No other image file types will work.
.ISO images can't be used for recovering deleted video files, as they don't contain free space clusters.
.DMG – the default type of image files in macOS systems – doesn't contain free space clusters and can't be used for recovering video files too.
Simply changing an .ISO or any other image extension to .IMG won't work either.
Windows users can create a RAW image of the memory card with the help of the free app – USB Image Tool. Here is how it works:
1. Download and install the tool.
2. Insert your (locked) memory card into a card reader.
3. Launch the USB Image Tool.
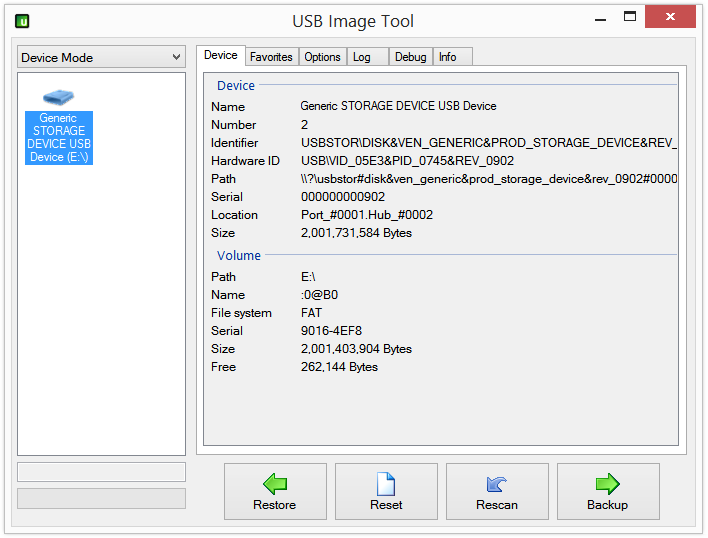
4. Select your memory card in the left-hand panel of the tool and then click on the Backup button.
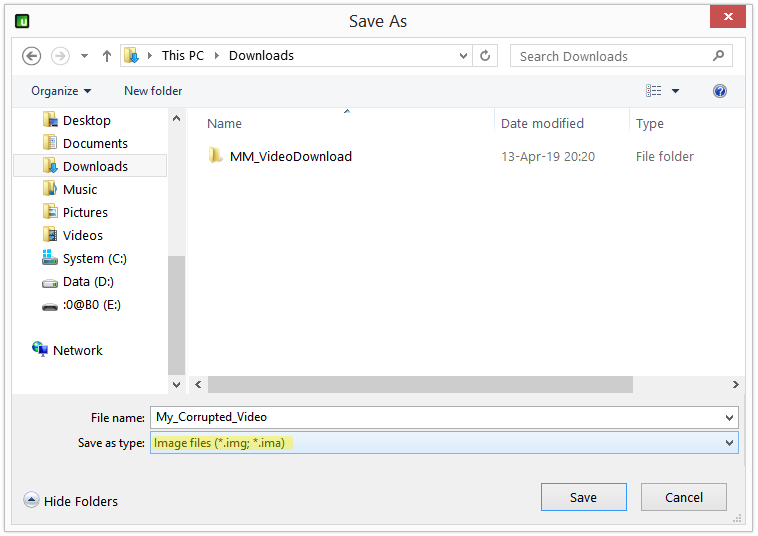
5. Give a name to your image file and choose where you want it to be saved. Then choose Image files (*.img) from the drop-down menu and click Save.
6. Wait until the tool generates the image file.
Also, here is a quick video tutorial on how to create an image out of your SD card using the tool:
MacOS users can create a RAW image of the memory card by following these steps:
1. Insert you SD card into the card reader in your Mac, or connect it via a USB card reader.
2. Open the Terminal application on your Mac. For this go to Applications > Utilities and then double click on Terminal. Alternatively, you can press Command + Spacebar to launch Spotlight, then type Terminal and double-click on the search results.
3. In the appeared window type the following command and press Enter:
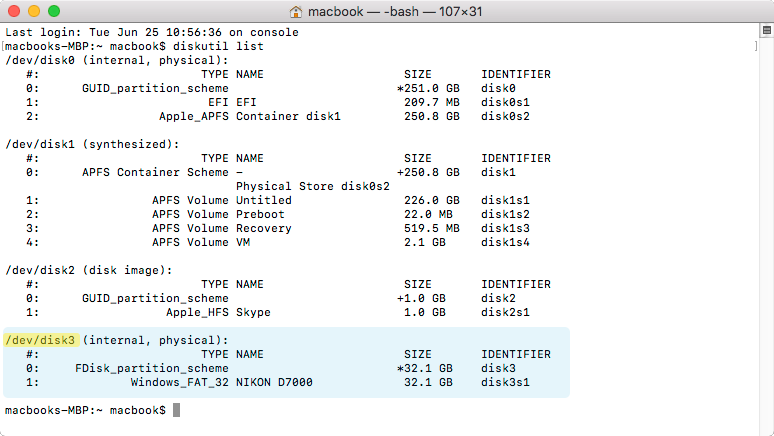
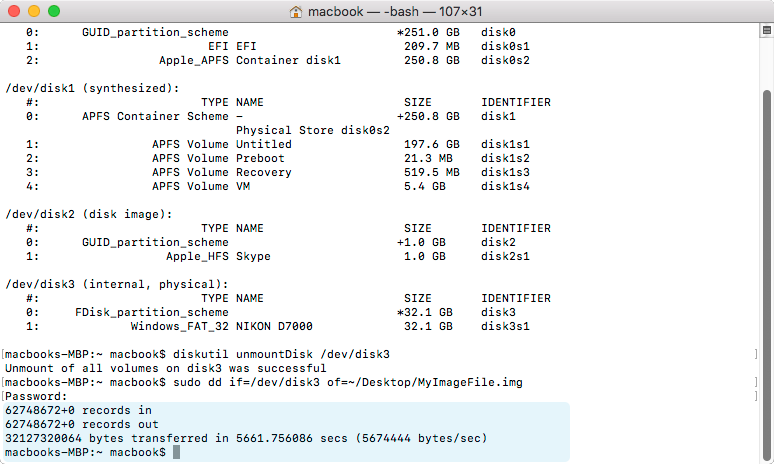
diskutil list
This will provide you with a list of available disks. You should find your SD card by NAME and SIZE. In this example our 32.1GB SD card is named as "NIKON D7000" and has the following location path: /dev/disk3
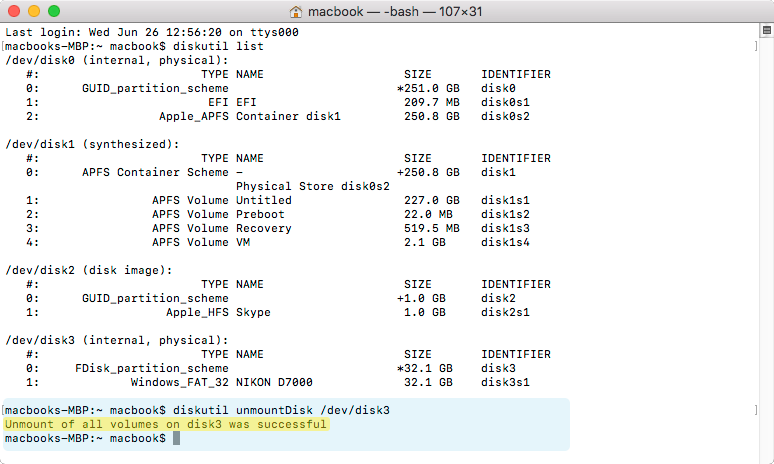
4. Unmount your SD card. For this type in the following command and then press Enter:
diskutil unmountDisk /dev/disk3
, where
- /dev/disk3 – is the path to the SD card. Please note that the path to your SD card may be different from what we have in this example
As a result, you should see the following message:
5. Now, you can create an image of your SD card. For this just enter the following command and press Enter:
sudo dd if=/dev/disk3 of=~/Desktop/MyImageFile.img
, where
- dd – the command name that runs a disk utility
- if=/dev/disk3 – path to the SD card. Please note that your SD card's path may differ from one in this example (see step 3)
- of=~/Desktop/MyImage.img – your specified image file name and path. In this example the image file "MyImage.img" will be saved on the desktop
Please note: You may be asked to enter your password to run this command. Just type your Mac password and press Enter. Also, once you enter the password, there won't be any progress bars or notifications indicating that the "dd" tool is running. However, the tool works in the background and may take quite a bit time to generate the image file. You should see the image file on the Desktop immediately, but it may be not finalized until you see a specific message in the Terminal. So, please don't try to open, delete or move the image file from the desktop until it is finalized (see the next step).
6. Wait until the "dd" tool will finish generating the image file. This may take up to several hours, depending on the size of you SD card. Once finished, you should see the following message in the Terminal:
The size of the final image should be exactly the same as the size of the SD card. So, for example, if you have a 32 GB SD card, then the image size must be 32 GB too.
If you have any questions, or have troubles creating a raw image (IMG) out of your SD card, please feel free to contact us and we'll be happy to help.
3. Recover Deleted Video Files from the Image
Now comes the tough part. You can try to recover your video files from the image using third-party data recovery tools. There are plenty of them both free and paid. But the problem here is that there are no tools available on the market that are smart enough to recover deleted video files properly, so that the video can actually be played (at least, we're not aware of such software as of yet).
Most of the times, footage recovered with "undelete" tools contains junk data, misses video fragments, or is completely unplayable.
The same issue applies to countless so-called data recovery services. Many of them do nothing, but use the same data recovery tools you can download from the Internet.
We often get emails from video studios and photographers who ask for help with repairing their footage after it had been already "undeleted" by someone else. Unfortunately, it's quite a common case when such "undeleted" video files contain junk data and there is little-to-no actual video left to recover.
What is worse, the "recovered" video files may look valid, have the correct file name, size and even the creation date. And since the files are formally recovered, there are cases when studios had to pay enormous checks for the undelete services even though the "recovered" videos don't play.
So here is a tip:
Do not ever pay for "recovered" video files before you actually preview them. Otherwise, you may end up with a video file that contains nothing, but junk data.
The reason most of the "undelete" tools and services fail when recovering deleted video files is file system fragmentation. When recording video on a memory card, it is usually split into multiple fragments and saved into free space blocks that may be located in different sections of the memory card.
When you delete a file, the file system erases details about where each file's fragment is located on the memory card. Usually, undelete tools can recover only the first fragment of the video file correctly. They often fail to locate the rest of the video fragments and hence include junk data taken from other files stored on the storage.
To resolve the issue, one would have to analyze the entire memory card sector-by-sector, to filter out junk data while collecting the correct file fragments and then assemble them into a final video. This is quite a time-consuming and painstaking task that can be done manually by video engineers.
At Restore.Media we have extensive experience in recovering such deleted video files. Unfortunately, though, not all video files can be recovered completely, since some parts of the files may be overwritten with other data and gone forever. However, we do recover all valid parts of the video that are left on the memory card after the deletion.
Once the video is recovered, we also provide you with a full-time preview. You only pay if you're satisfied with the results, which is much more fair compared to when you have to pay for the undeleted video files regardless of whether they can be played or not.
The price is negotiable and depends on the size of the image file that needs to be processed/analyzed, so that we can extract video fragments from it.
To make an enquiry for manual recovery of the deleted video files, just create a RAW image (.IMG) of the memory card as described above, upload it to a hosting service or cloud storage provider, such as Google Drive or Dropbox, and then email us a link to the image file along with a short description of what needs to be recovered. Our video engineers will analyze the image file and provide you with a cost estimate and further details.
Note: we recover video files deleted from flash memory cards only, such as SD, microSD and alike. We don't work with videos deleted from SSD or HDD drives.
If you have a large SD card, you can split its image into multiple files, so that it is easier to upload them to cloud storage.
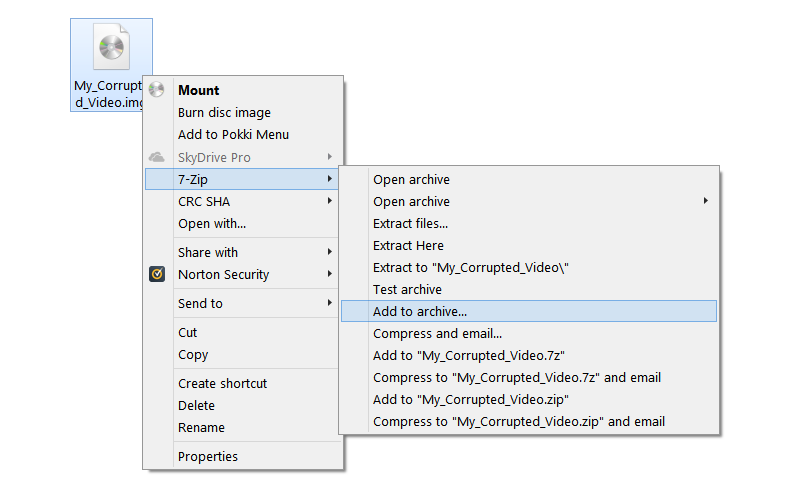
To split an image file, Windows users can use a free tool – 7-Zip. Here is how it works:
1. Download and install the 7-Zip tool.
2. Right-click on the image file and select 7-Zip > Add to archive…
3. In the appeared window choose the following options:
- Archive format: zip
- Compression level: Store
- Split to volumes, bytes: 5000M (you can choose other options here, but we suggest splitting the image to files of no less than 4GB.
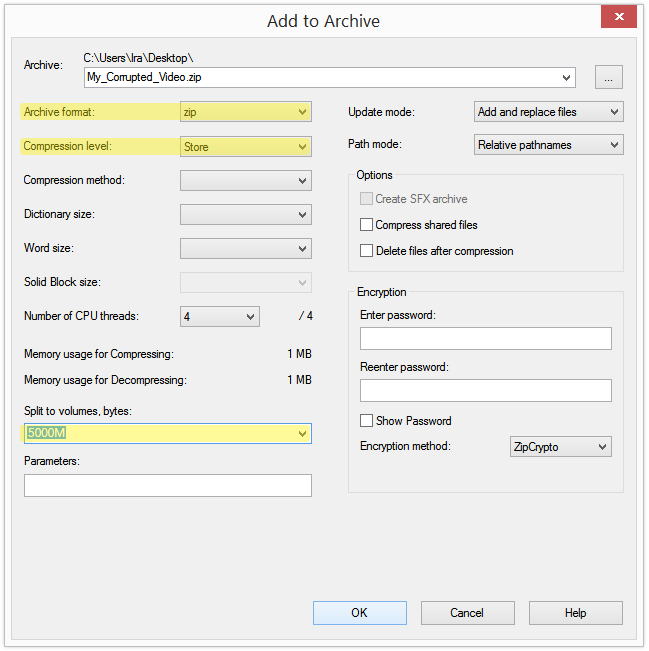
4. Click Ok and wait until the toll splits the image file.
5. Upload the files to a hosting provider or a cloud storage service, such as Google Drive or Dropbox and then email us the link, so that our engineers can work with your image files.
MacOS users can split the image with the help of the Keka app (the macOS file archiver) by following these steps:
1. Download and install the Keka app.
2. Launch the app.
3. Set compression type to ZIP
4. Set compression method to Store
5. In the Split field enter: 5 GB. This will split your image file into multiple smaller files, 5 GB each. You can enter other numbers here, but we recommend that you split your image to files of no less than 4 GB in size each.
6. Enable the Exclude Mac resource forks option. Your settings window should look the following way:
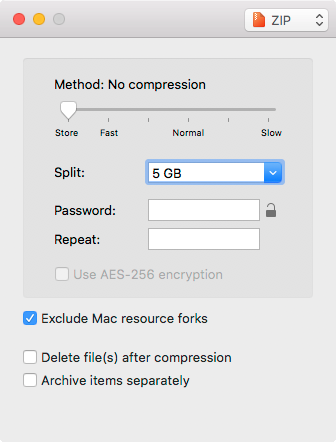
7. Once all is set up, simply drag & drop the image file over to the settings window. You will be asked to set the name and location for the split files. After you enter the details, the app will start splitting the files. This may take a few minutes.
8. Upload your split files to a hosting provider or a cloud storage provider and email us the link, so that our engineers can work with them.
For more details on how the Keka app works, please see their help guide.
Recap
If you shoot footage on a regular basis, eventually you may face an issue when your video files get damaged or erased due to a glitch or a mistake. This may happen at the worst possible moment. But if you're prepared for such accidents, the chances to recover the video files are quite high. Just follow these simple rules:
1. Use only genuine memory cards from respected brands.
2. Quick-format your memory cards before shooting important footage. This will prevent significant file fragmentation, which, in turn, will make it easier to recover video files in case any disaster happens.
3. If you've accidentally deleted your footage from a memory card, take the card out of the camera, or safe-eject it from your computer. Do not write/modify anything on the card, or you may overwrite deleted files. If it's an SD card – lock it with a safety switch.
4. Make a complete RAW image of the entire memory card. The image type must be ".IMG".
5. Now, you can try to recover deleted video files with "undelete" tools/services. But don't ever pay for the "recovered" footage before you actually had a chance to preview the video.
You can also contact us for manual recovery of your video files. Make sure to include a link to the image of your memory card – our engineers will be happy to help!